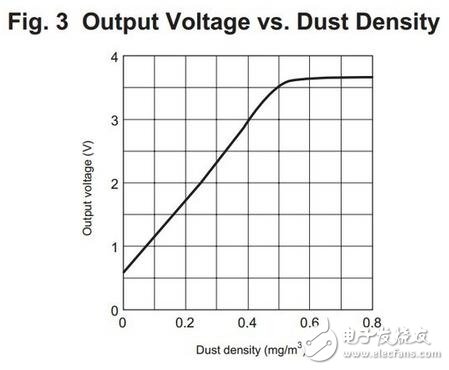
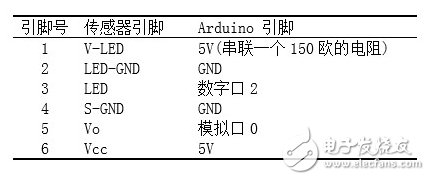
It is time for you to make an air pollution monitoring device. With an air monitoring sensor with an Arduino controller and expansion board, a simple air monitoring device can be built right away. Even without the professional monitoring equipment and brick home reports, you can scientifically and objectively understand the air quality you breathe at all times! Hardware list -Sharp GP2Y10 Air Quality Sensor - DFRduino UNO R3 - IO sensor expansion board V7 - Adapter plate (150 ohm, 220uF capacitor, breadboard if no adapter plate is available) - DuPont line Step 1: Hardware connection Figure 1 complete connection diagram 1. I/O expansion board is plugged into UNO 2. The dust sensor and the adapter board are connected by DuPont line. 3. The adapter board is marked with two interfaces labeled D and A respectively. D → digital port 2 A → analog port 0 Is it convenient to connect by simply plugging in a few lines? Step 2: Burn in the code Burn DFRduino UNO R3 according to the tutorial code After the completion, is it still very vague to get a string of numbers? Let's take a quick look at the dust sensor, which can be seen with the code. (Of course, if you don't need to know, just download the code and use it.) The figure above is the internal structure diagram of the dust sensor and the hardware description. As can be seen from the figure, at the transmitting end, we need to drive an infrared transmitting tube, which is pin 3. Corresponding to the ledPower defined in the program. Similarly, we can also see that the output is pin 5, and the output is analog, corresponding to the measurePin in the program. So how do we get the value we want? The figure below is taken from the datasheet. You can see that the output voltage of the dust sensor is almost linear. dustDensity = 0.17 * calcVoltage - 0.1; This formula curve is approximately converted (from Chris Nafis). Here dustDensity is the dust density value in mg/m3. calcVoltage is the output voltage value. We all know that the output 0~5V voltage corresponds to the UNO analog port and reads 0~1023. calcVoltage = voMeasured * (5.0 / 1024.0); This formula is the analog value converted to a voltage value. voMeasured analog port output. According to the datasheet, which is shown in the figure above, we need to turn on the internal LED and wait for 280μs (microseconds) before reading the output value. As can be seen from the above figure, the entire pulse duration is 320 μs. Therefore, we still have to wait 40μs before we can turn off the LED. The above is a brief description of the program and the working principle of the dust sensor. Step 3: There is no adapter plate There is still a problem. Some people say that if there is no adapter board, then look at the picture above. Have you seen it? We need to connect a 150 ohm resistor to pin 1 and a 220uF capacitor in parallel. This is why we use the adapter board. This part is completed on the adapter board, which greatly facilitates the connection and increases the stability. Let's take a look at the pin position on the physical map. If you need your own external resistors and capacitors, please continue to look down. " The Arduino pin corresponding to the dust sensor: Just follow the link, after the connection is complete, also download the sample code of the tutorial. The PM2.5 detector code is as follows: Int measurePin = 0; // connect analog port 0 Int ledPower = 2; // connect digital port 2 Int samplingTime = 280; Int deltaTime = 40; Int sleepTime = 9680; Float voMeasured = 0; Float calcVoltage = 0; Float dustDensity = 0; Void setup(){ Serial.begin(9600); pinMode(ledPower,OUTPUT); } Void loop(){ digitalWrite(ledPower, LOW); //turn on the internal LED delayMicroseconds(samplingTime); // 280us wait time after turning on the LED voMeasured = analogRead(measurePin); // read the analog value delayMicroseconds(deltaTime); // 40us wait time digitalWrite(ledPower,HIGH); // turn off the LED delayMicroseconds(sleepTime); // 0 - 5V mapped to 0 - 1023 integer values // recover voltage calcVoltage = voMeasured * (5.0 / 1024.0); // convert analog values ​​to voltage values dustDensity = 0.17 * calcVoltage - 0.1; // Convert the voltage value to the dust density output unit Serial.print("Raw Signal Value (0-1023): â€); Serial.print(voMeasured); Serial.print(" - Voltage: â€); Serial.print(calcVoltage); Serial.print(" - Dust Density: â€); Serial.println(dustDensity); // Output unit: mg/m3 Delay(1000); } Modular Switch And Socket,Gm Modular Switches,Gm Electrical Switches,Modular Switches For Home ZHEJIANG HUAYAN ELECTRIC CO.,LTD , https://www.huayanelectric.com


